Ⅰ 为什么选择 ngx_waf
1· 是现如今还在积极维护的NGINX防火墙之一(仅这一点就让我心动了,感谢作者大大的辛勤付出)
2· 高性能:ngx_waf 由 C 编写,性能不知道高到哪去了
3· 兼容 ModSecurity:可以使用开放式网络应用安全项目(OWASP)® 的核心规则库,不用自己去维护庞大的规则库(但平日自己的小修小补还是要滴,多看看日志有没有漏网之鱼)
4· 验证码:支持三种验证码:hCaptcha、reCAPTCHAv2 和 reCAPTCHAv3。不用费力去写插件就能支持验证码的感觉真的很爽。而且可以在面对CC攻击时自动开启验证码帮助你进行人机识别
5· CC 防御:一个防火墙应当拥有的功能,作用不用多说以下略1w字。
以下是ngx_waf的所有功能
· 兼容 ModSecurity。
· SQL 注入防护(Powered By libinjection)。
· XSS 攻击防护(Powered By libinjection)。
· 支持 IPV4 和 IPV6。
· 支持开启验证码(CAPTCHA),支持 hCaptcha、reCAPTCHAv2和 reCAPTCHAv3 。
· 支持识别友好爬虫(如 BaiduSpider)并自动放行(基于 User-Agent 和 IP 的识别)。此功能仅限最新的 Current 版本。
· CC 防御,超出限制后自动拉黑对应 IP 一段时间或者使用验证码做人机识别。
· IP 黑白名单,同时支持类似 `192.168.0.0/16` 和 `fe80::/10`,即支持点分十进制和冒号十六进制表示法和网段划分。
· POST 黑名单。
· URL 黑白名单
· 查询字符串(Query String)黑名单。
· UserAgent 黑名单。
· Cookie 黑名单。
· Referer 黑白名单。
Ⅱ 安装
编译安装 ngx_waf 模块
本文以v10.1.2 Current的Ngx_waf为例(你的NGINX版本需≥1.23.0)
系统:Debian
编译安装Current版本的ngx_waf 模块:
apt install -y libtool m4 automake gcc g++ make git wget libpcre3 libpcre3-dev libbrotli-dev

cd /usr/local/src \
  && git clone -b current https://github.com/ADD-SP/ngx_waf.git \
  && cd ngx_waf

cd /usr/local/src/ngx_waf \
  && git clone https://github.com/DaveGamble/cJSON.git lib/cjson

cd /usr/local/src/ngx_waf \
  && git clone https://github.com/libinjection/libinjection.git inc/libinjection

cd /usr/local/src \
  && git clone https://github.com/jedisct1/libsodium.git --branch stable libsodium-src \
  && cd libsodium-src \
  && ./configure --prefix=/usr/local/src/libsodium --with-pic \
  && make -j$(nproc) && make check -j $(nproc) && make install \
  && export LIB_SODIUM=/usr/local/src/libsodium

cd /usr/local/src \
  &&  wget https://github.com/maxmind/libmaxminddb/releases/download/1.6.0/libmaxminddb-1.6.0.tar.gz -O libmaxminddb.tar.gz && mkdir libmaxminddb \
  && tar -zxf "libmaxminddb.tar.gz" -C libmaxminddb --strip-components=1 \
  && cd libmaxminddb \
  && ./configure --prefix=/usr/local/libmaxminddb \
  && make -j $(nproc) \
  && make install \
  && cd /usr/local/src \
  && git clone -b v3.0.12 https://github.com/owasp-modsecurity/ModSecurity \
  && cd ModSecurity \
  && chmod +x build.sh \
  && ./build.sh \
  && git submodule init \
  && git submodule update \
  && ./configure --prefix=/usr/local/modsecurity --with-maxmind=/usr/local/libmaxminddb \
  && make -j$(nproc) \
  && make install \
  && export LIB_MODSECURITY=/usr/local/modsecurity

cd /usr/local/src/ngx_waf\
  && git clone -b v2.3.0 https://github.com/troydhanson/uthash.git lib/uthash\
  && export LIB_UTHASH=/usr/local/src/ngx_waf/uthash
修改LNMP文件
进入LNMP所在目录,修改lnmp1.x/include/upgrade_nginx.sh文件
在./configure(大概在62行和64行)后追加以下两条命令
sed -i 's/-Werror//' objs/Makefile
sed -i 's/^\(CFLAGS.*\)/\1 -fstack-protector-strong -Wno-sign-compare/' objs/Makefile
sed -i 's/-Werror//' objs/Makefile 如果你的gcc版本过老,添加这条命令可以防止编译停止。(如果你有信心,可以把这条命令删掉)然后修改lnmp1.x/lnmp.conf文件
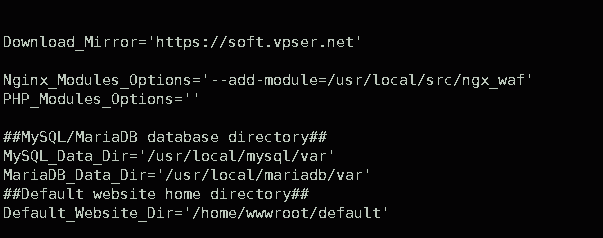
在Nginx_Modules_Options=' '的引号中追加--add-module=/usr/local/src/ngx_waf
编译模块
进入LNMP目录编译模块
./upgrade.sh nginx输入版本号,回车,静待编译完成即可(NGINX 版本号可在 NGINX 下载页 找到预升级的版本号进行输入并按下回车键)
Ⅲ 配置 ngx_waf 防火墙
配置 ngx_waf规则集
cd /usr/local/nginx
mkdir rules && cd rules
cp -r /usr/local/src/ngx_waf/assets/ /usr/local/nginx/rules/
配置 ModSecurity 规则集
cd /usr/local/nginx/rules
git clone https://github.com/coreruleset/coreruleset.git
cp coreruleset/crs-setup.conf.example coreruleset/crs-setup.conf
cp /usr/local/src/ModSecurity/modsecurity.conf-recommended /usr/local/nginx/rules/modsecurity.conf
cp /usr/local/src/ModSecurity/unicode.mapping /usr/local/nginx/rules/
之后编辑modsecurity.conf
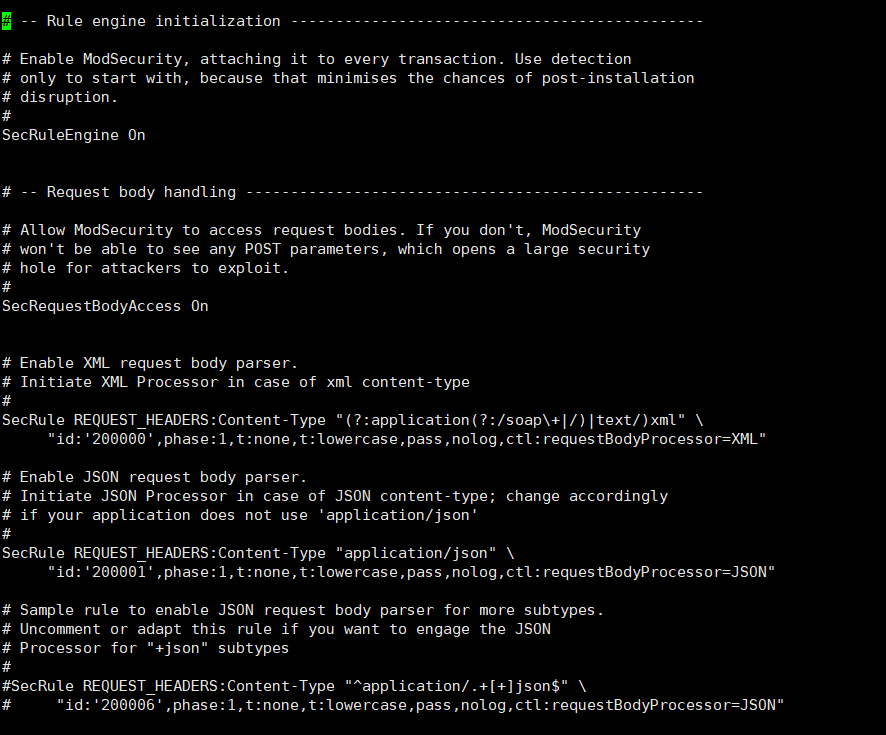
vim /usr/local/nginx/rules/modsecurity.confmodsecurity默认不会拦截恶意请求,它只会提示并写入日志,要开启拦截,需要把SecRuleEngine的参数改为On:
现在新建一个modsecurity.waf.conf的主配置文件:
vim /usr/local/nginx/rules/modsecurity.waf.conf在modsecurity.waf.conf内引用全部的规则:
Include /usr/local/nginx/rules/modsecurity.conf
Include /usr/local/nginx/rules/coreruleset/crs-setup.conf
Include /usr/local/nginx/rules/coreruleset/rules/*.conf
配置 NGINX
nginx.conf
修改NGINX的配置文件/usr/local/nginx/conf/nginx.conf
在http块中添加以下代码
# 启用模块
waf on;
# 指定规则文件所在目录
waf_rule_path /usr/local/nginx/rules/assets/rules/;
# 指定防火墙的工作模式
waf_mode DYNAMIC;
# 被攻击时降低带宽占用
waf_action cc_deny=444 modsecurity=follow;
#设置当请求被拦截时返回的页面
waf_block_page /usr/local/nginx/rules/assets/block.html;
#验证友好的爬虫
waf_verify_bot strict GoogleBot BingBot BaiduSpider YandexBot SogouSpider;
#启用 ModSecurity
waf_modsecurity on file=/usr/local/nginx/rules/modsecurity.waf.conf;
修改网站配置
进入网站配置文件目录
cd /usr/local/nginx/conf/vhost修改网站的配置文件
在顶行创建定义一段共享内存(修改须在server块外)
waf_zone name=waf size=5m;# 指定请求频率上限为每分钟1000次,超过请求次数上限进行验证码验证,验证错误拉黑60分钟
waf_cc_deny on rate=1000r/m duration=1h zone=waf:cc;
waf_captcha off prov=hCaptcha secret=your_secret sitekey=your_sitekey;
waf_action cc_deny=CAPTCHA zone=waf:action;
# 最多缓存 50 个检测目标的检测结果
waf_cache on capacity=50;waf_captcha语法解释:
prov:验证码平台,包含 hCaptcha、reCAPTCHAv2和 reCAPTCHAv3。sitekey:你从验证码平台获取的网站密钥,当且仅当参数file被省略时需要设置本参数。secret:用于确认验证码的运行结果的密钥,你可以从对应的验证码平台获得。- 更多语法解释到Ngx_waf waf_captcha了解
如果你不希望开启验证码,可以使用下面的配置
# 指定请求频率上限为每分钟1000次,超过请求次数上限进行验证码验证,验证错误拉黑60分钟
waf_cc_deny on rate=1000r/m duration=1h zone=waf:cc;
# 最多缓存 50 个检测目标的检测结果
waf_cache on capacity=50;
修改完成后,重启NGINX生效
lnmp nginx restartⅣ 修改ngx_waf规则
进入ngx_waf规则目录
cd /usr/local/nginx/rules/assets/rules/IP 白名单,文件名为 white-ipv4 和 white-ipv6。
IP 黑名单,文件名为 ipv4 和 ipv6。
Url 白名单,文件名为 white-url。
Url 黑名单,文件名为 url。
Get 参数黑名单,文件名为 args。
Post 请求体黑名单,文件名为 post。
UserAgent 黑名单,文件名为 user-agent。
Cookie 黑名单,文件名为 cookie。
Referer 白名单,文件名为 white-referer。
Referer 黑名单,文件名为 referer。
有些规则文件需要书写正则表达式,书写时每行一个正则表达式, 正则表达式遵循 PCRE 标准。
Ⅴ 结语
Ngx_waf 还有好多的功能可供玩耍(又可以水一期了),例如修改请求被拦截时返回的页面、开启五秒盾、或者为站点开启验证码、针对路径或文件限流。
ngx_waf虽然前置数量多,安装也略微繁琐。但安装成功后带来的好处也是显而易见的,并且其丰富的功能也是减少了后续对网站优化的成本。
可惜网络上与ngx_waf相关的文章还是很少,发布时间也比较久,很少教程适用Current版的ngx_waf,希望ngx_waf能让更多人所熟知,ngx_waf能越来越好。
参考
安装 - ngx_waf
配置语法 - ngx_waf
规则说明 - ngx_waf
开启验证码 - ngx_waf
ngx_waf:一款高大全的 Nginx 网站防火墙模块 - 喵斯基部落
Debian10不重新编译nginx配置modsecurity v3 - 荒岛


到此一游